Пожалуйста помогите не запускается Minecraft, java пере устанавливал раз так 20 серавно ошибка совместимость делал 0 процентовпомгите может что-то можно сделать
Если с совместимостью то прекращена работа программы Java(TM) Platform SE binary а если без то java virtual machine launcher ((((((
дам 7 сотен тому кто поможет с майнкрафтом (((
9 лет
Дополнен 9 лет назад
Лучший ответ
Здравствуйте! Вероятно антивирус может шалить, попробуйте его отключить. Если же у вас стоит Windows 10/8,то стоит нажать по ярлыку ПКМ, потом перейти в Свойства — Совместимость — Запустить программу в режиме совместимости с: (выберите Windows 7). Должно помочь!
Остальные ответы
Щелкни правой кнопкой мыши на маинкрафте перейди в совместимость Использовать 256 цветов.
Мне такой способ помог однажды
и если что деньги сюда клади :D:D:D
8(912)079-82-51
у меня токаяже проблема спосибо тебе огромноеееее очень ты лучший DaNeK ONE
DaNeK ONE помоги не помогло
Полей клаву святой водой и ударь системник крестом 3 раза!
1 причина- Это если нет [Java] 2 причина- если [разряд 64], можно установить другой. 3 причина-[Совместимость] 4 причина переустановка майнкрафт
Что делать если вылетает minecraft с ошибкой «Прекращена работа программы Java(TM) Platform SE binary»
В подробностях это пишет:
Сигнатура проблемы:
Имя события проблемы: BEX
Имя приложения: javaw.exe
Версия приложения: 8.0.1210.13
Отметка времени приложения: 584f5bdd
Имя модуля с ошибкой: nvinit.dll
Версия модуля с ошибкой: 21.21.13.7849
Отметка времени модуля с ошибкой: 58820880
Смещение исключения: 0000d476
Код исключения: c0000409
Данные исключения: 00000002
Версия ОС: 6.3.9600.2.0.0.256.48
Код языка: 1049
Дополнительные сведения 1:a8c1
Дополнительные сведения 2:a8c11cb473b3887cdf25cc4d0d7c8547
Дополнительные сведения 3:a762
Дополнительные сведения 4:a762f700cf8b4421ffb9aef39e1260eb
Что делать? Я уже переустанавливал Java, Minecraft, ничего не помогает!
5 лет
Ответы
1. Переустановить яву.
2. Если не помогло — переустановить винду.
3. Если и это не помогло — удалить шлаккрафт нафиг)
4. Если так и не помогло — комп в окно…
Моды удали или поменяй размер памяти явы
Обнови или переустанови джаву. Если не поможет то делай так:
1.Заходишь в корневую папку майнкрафта.
2.Выделяешь все файлы этой «Игры».
3.Нажимаешь правую кнопку мыши и выбираешь пункт «Удалить»
ГОТОВО!
Очень часто игроки одной из самых популярных песочниц Minecraft, сталкиваются с проблемами при запуске игры. Среди таких сбоев можно выделить ошибку «Прекращена работа программы Java(TM) Platform SE binary», которая появляется непосредственно во время запуска игрового процесса через меню. Мы постараемся дать дельные советы, которые подскажут, что делать если не работает Java платформа в Майнкрафт.
Отчего возникает ошибка
Ошибка Java(TM) Platform SE binary появляется в Майнкрафт сразу после запуска игры через игровой лаунчер, при длительном подключении к серверам, либо произвольно, во время игры. Сбой может появляться постоянно, не давая даже запустить игру, либо временами. Причин проблемы может быть очень много: совместимость разрядности Java с Windows, битые драйвера, конфликт видеокарт, отсутствие актуальным обновлений, использование левых модов. Также сюда следует отнести сбитые графические настройки в Майнкрафт.
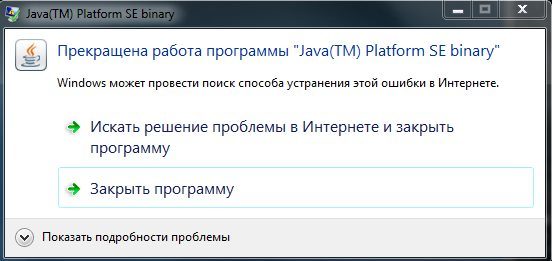
Ошибка «Прекращена работа программы Java(TM) Platform SE binary»
Программа Java в Windows — это специальный плагин, который помогает в загрузке некоторых приложений, а также скриптов в браузере, написанных на языке одноименном языке программирования.
Стоит отметить, что проблема с уведомлением о сбое «Прекращена работа программы Java(TM) Platform SE binary», появляется не только в Minecraft, поэтому мы собрали как советы по решению сбоя в игре, так и в других приложениях.
- Если ошибка появляется после первого запуска игры, тогда следует проверить наличие Java расширения на ПК. По идее, плагин должен быть загружен на компьютер при установке ОС. Поэтому причина полного отсутствия маловероятна. Если же его нет, тогда загрузите плагин на официальной странице — java.com/ru/download/manual.jsp.
- Проверьте разрядность установленной Java на вашем Windows 7/8/8.1/10 — она должна совпадать. В Панели управления отыщите Java, если рядом нет приписок, то это x64, если рядом будет в скобочках стоять 32 бита, тогда соответственно x32. Там же, в Панели пройдите в опцию Система, в сведениях увидите разрядность Windows.
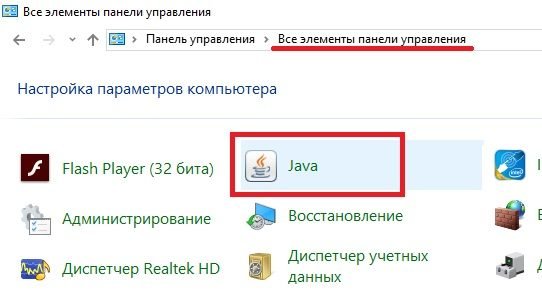 Проверка разрядности плагина Java
Видеокарта
Чаще всего проблема возникает из-за графического движка в игре. Поэтому вот несколько советов по настройкам:
- Через Панель управления войдите в Систему, слева выберите «Дополнительные параметры системы», в «Дополнительно» снизу увидите и кликайте по «Переменные среды». В новом окне снизу жмите «Создать». Пропишите значения _JAVA_OPTIONS и -Xmx256M.
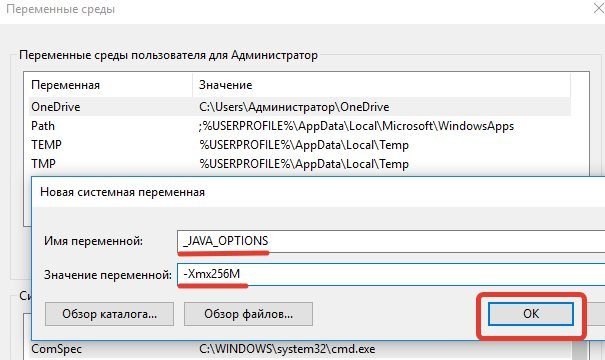 Вводим новую системную переменную
 - После откройте игровой лаунчер и пройдите в опции игры — Настройки видео (Video Settings). Здесь переключите на значение Off — VSync, VBos и Smooth Lighting. Графику переключите с Fast на Fancy.
- Вернитесь назад и выставьте значение FOV на Normal (70).
- Запустите игру.
Дополнительные советы по настройкам видеокарты:
- Обновите драйвера на вашем ПК. Конкретно вам нужны драйвера видеокарты. Это можно сделать через системную опцию, либо применить тот же Driver Pack Solution.
- Ошибка возможна из-за конфликта со встроенной видеокартой. Для этого её следует отключить и перезагрузить ПК. Вот пояснения на видео.
Дополнительные советы
- После того, как вы нажимаете «Закрыть программу», появляется MineCraft Launcher. Внизу этого лаунчера есть кнопка New Profile (Новый профиль) — кликайте по нему. Пропишите новое имя (Profile Name), а ниже, в Java Settings, проверьте путь к исполняемому файлу. Если в конце указано javaw.exe, тогда удалите букву W. Сохраните профиль и пробуйте запуститься.
- Переустановите моды и дополнительные расширения к игре. Часто они являются источником проблемы.
- Отключите экраны антивируса на время загрузки и пробуйте запуститься.
- Переустановите Майнкрафт.
Заключение
Данные советы должны помочь в решении ошибки с Java не только в игре Майнкрафт, но и в других конфликтах. Если вы знаете что еще можно делать для исправления — пишите в комментариях.
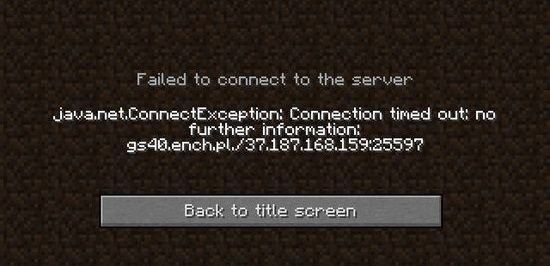
Перед устранением убедитесь в отсутствии следующих причин:
- технические работы на сервере;
- окончание возможности пользоваться платными услугами;
- отсутствие подключения интернета от провайдера на компьютере в целом;
- блокировка игрока по IP.
Если перечисленных проблем не замечено, обратите внимание на такие факторы:
- Актуальность версии игры. Если подключиться к серверу невозможно, проверьте наличие обновлений Minecraft. Конфликт файлов неизбежно приведет к ошибке. Достаточно доступа к интернету и возможности загрузки новых пакетов.
- Желание установить новые моды и патчи приводит к тому, что необкатанное ПО блокирует подключение к серверу. Удалите последние дополнения или переустановите игру. Чтобы предотвратить ошибку, используйте проверенные расширения.
- Блокировка брандмауэра или антивируса заслуживает отдельного внимания. Явно определить источник проблемы не получится. Пользователю придется отключать программы для защиты компьютера по очереди.
Если вышеуказанные параметры в порядке, то проще обратиться к администрации сервера.
Ошибка Java. lang. NullPointerException
Ошибка lang.NullPointerException в модуле Java говорит о том, что произошел сбой в работе программы, взаимодействующей с Джавой. Часто проблема возникает у игроков Minecraft.
Если пользователь встретил данную ошибку на стадии запуска игры, переустановите Java на компьютере. Игра, не включающаяся по требованию, также требует переустановки.
Если это не помогло и ошибка с текстом Java.lang.NullPointerException появляется снова, проблемное место находится в самой программе. Правильнее всего написать разработчикам или на специализированный форум.
Пользователям Minecraft также придется создать новую учетную запись на компьютере, наделив ее правами администратора.
Ошибка Java Virtual Machine Launcher
Установка Джавы может сопровождаться ошибкой Java Virtual Machine Launcher. Окно с таким текстом говорит о том, что пользователь некорректно завершил работу с программой или игрой, например, сервером Minecraft. Теперь виртуальной машине не хватает памяти, чтобы загрузиться.
Чтобы исправить ошибку Java Virtual Machine Launcher, настройте переменную среды:
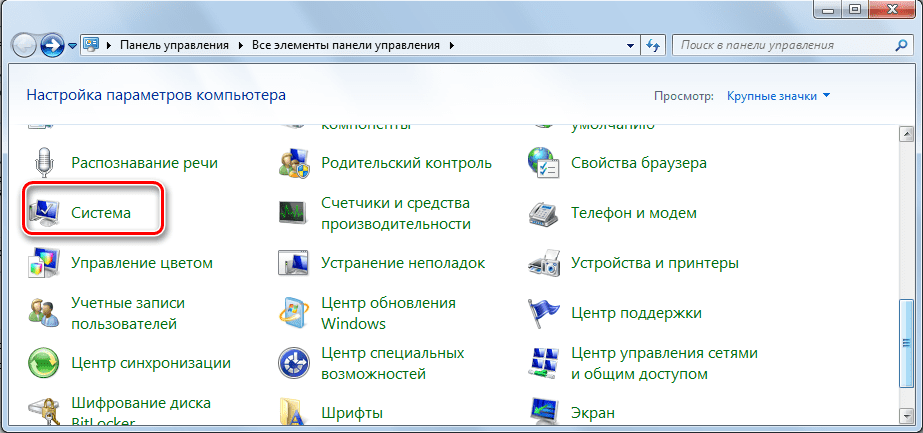
- Зайдите на панель управления. Из предложенных вариантов выберите «Система».
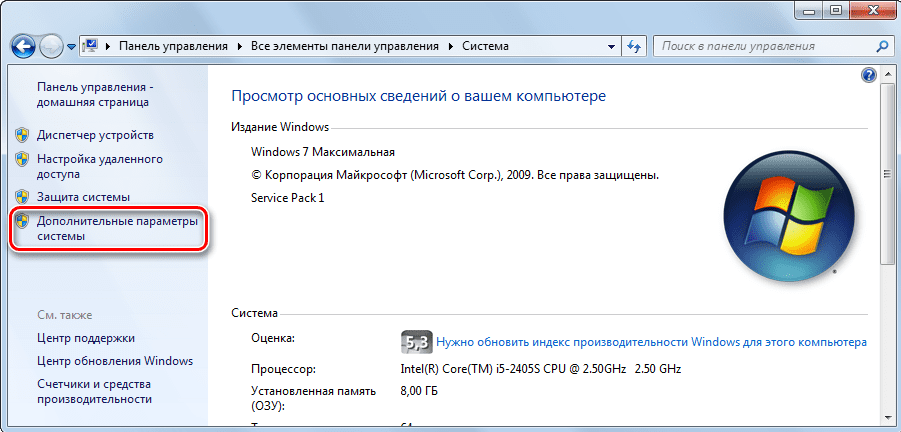
- В левой колонке найдите «Дополнительные параметры системы».
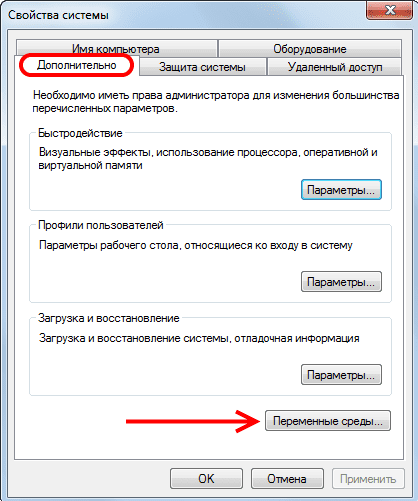
- В появившемся окне откройте вкладку «Дополнительно», а снизу сделайте одиночный клик по кнопке «Переменные среды».
- Чтобы вернуть доступ к игровому серверу, выберите кнопку «Создать».
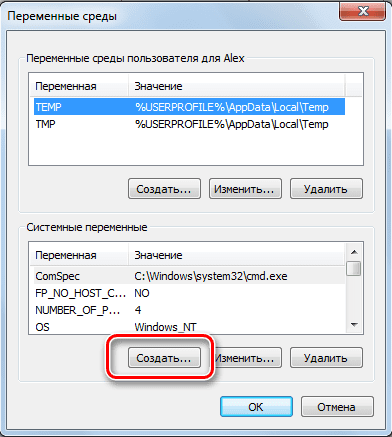
- В название вписывайте _JAVA_OPTIONS, в значение – -Xmx512M.
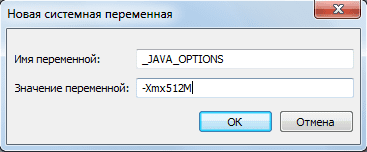
Выделенных дополнительно 512 Мб достаточно, если произошла ошибка при запуске виртуальной Java-машины.
Ошибка Application Blocked by Java Security
Следствием ошибки стало увеличение безопасности в функционале Джава. Программа блокирует доступ пользователя к самоподписанным и неподписанным приложениям. Работает модуль в качестве антивируса с версии 7 Update 51. Проверьте версию Java, обратившись к нашим инструкциям.
Возникает такая проблема и после неудачного обновления ПО от провайдеров или других онлайн-приложений.
- Через «Панель управления» откройте Java Control Panel.
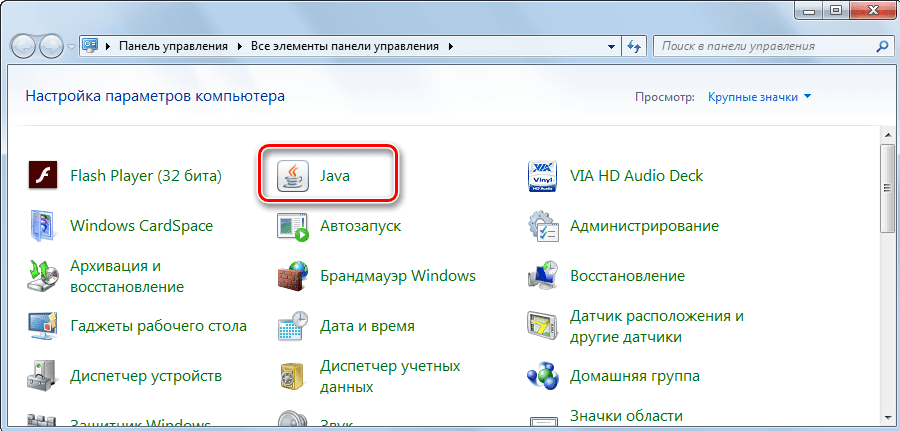
- В появившемся окне перейдите на вкладку Security, нажмите Edit Site List.
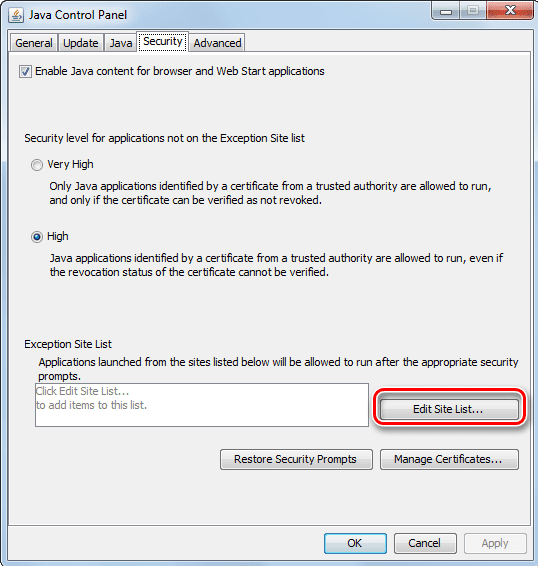
- Далее нажмите кнопку Add, введите адрес сайта, с которым случился конфликт у модуля.
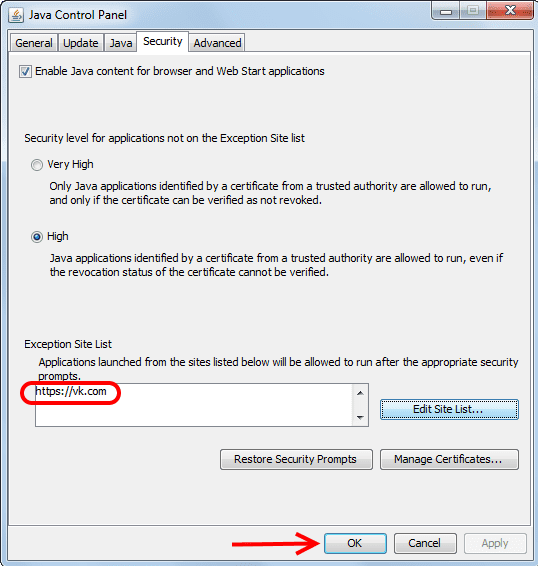
- После нажатия OK сайт окажется в списке исключений.
Таким образом можно исправлять любые проблемы, связанные с неподписанными или самоподписанными платформами, если к ним есть доверие.
Ошибка A Java Exception has occurred
Ошибка означает непредвиденный конфликт приложения и пакета Джава. Но это не связано с безопасностью, поэтому решение проблемы заключается не в исключении сайтов. Перед тем как понять, что делать, нужно найти причину появления сообщения.
Выполните поочередно следующие действия:
- Переустановите JVM и JRE.
- Скачайте последнюю версию Minecraft.
- Проверьте драйвера видеокарты.
Если проблема решена после первого этапа, то этого достаточно.
Java не является внутренней или внешней командой
Ошибка с текстом «Java не является внутренней или внешней командой» также возникает у геймеров. Сложно сказать, что ее провоцирует, но исправить это легко:
- Определите место установки модуля. Искать можно как JRE, так и JDK (с предустановленным Javac). На Windows 7 и 10 папка Джава расположена по пути C:\Program Files.
- Найдите папку Bin, скопируйте путь до нее целиком. Он может оставаться в буфере обмена, пока выполняются следующие пункты.
- Перейдите в переменные среды (способ описан выше).
- В списке «Системных переменных» есть пункт Path. Сделайте по нему одиночный клик, нажмите «Изменить».
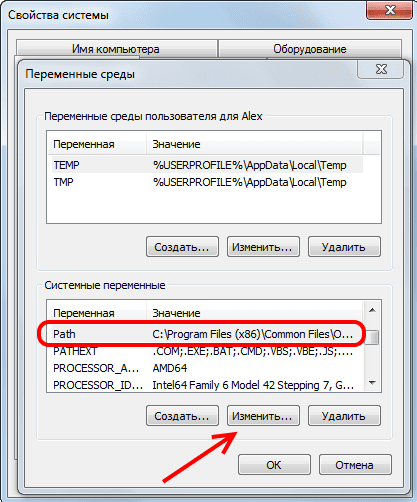
- Рекомендуется сохранить исходную строку, но не стоит забывать, что в буфере обмена находится путь до папки Bin.
- В самый конец строки добавляется путь из буфера. Предварительно поставьте точку с запятой.
- Чтобы сохранить свежую версию переменной, выйдите из настройки и нажмите OK.
https://youtube.com/watch?v=xX3ZLX9ESDo%3Fstart%3D28%26feature%3Doembed
Прекращена работа программы Java(TM) Platform SE binary
Если не работает Minecraft или другая программа, пользователь может видеть ошибку «Прекращена работа программы Java(TM) Platform SE binary».
- Появление ошибки после первого запуска приложения свидетельствует о возможном отсутствии модуля Джава на ПК. Даже если есть какие-то следы ПО, то их лучше удалить и скачать плагин заново.
- Если Джава установлена на компьютере, сравните ее разрядность с аналогичным параметром операционной системы. Для этого найдите плагин в панели управления. Название, не содержащее цифр, говорит о версии x64, в противном случае установлена x32.
После исключения отсутствия модуля или несовместимости остается только один источник проблемы – видеокарта. Выполните следующие действия:
- Создайте новую переменную среды. О том, как это сделать, рассказано выше. Напишите следующие параметры: имя – _JAVA_OPTIONS, значение – -Xmx256M.
- Сохраните переменную, перейдите к настройкам в игре.
- Отключите следующие параметры: VSync, VBos, Smooth Lighting.
- FOV должно иметь значение Normal.
Для закрепления результата обновите драйвера для видеокарты и перезагрузите компьютер.
Note: The issue is not exclusive to Windows 10 and is frequently reported on Windows 8. There is no apparent link between the build number and this type of error.
Method 1: Update GPU card drivers
The most common scenario in which the “Java(TM) Platform SE binary has stopped working” error occurs is when there’s a conflict between the Java Environment and your graphics card driver.
Since most video driver issues that we’re causing this issue have been fixed by GPU manufacturers, you can probably take care of the issue by simply updating your dedicated GPU drivers to the latest version.
Each major GPU manufacturer has some kind of software that will automatically detect your GPU model and install the latest version of the required graphics card driver. Here are the tools capable of doing this according to your GPU manufacturer:
Once your graphics drivers have been updated, reboot your computer and see if the issue has been resolved at the next startup. If you are still prevented from opening certain Java-based applications by the “Java(TM) Platform SE binary has stopped working” error, move down to Method 2.
Method 2: Reinstall all Java SE Related applications
Here’s a quick guide through the whole thing:
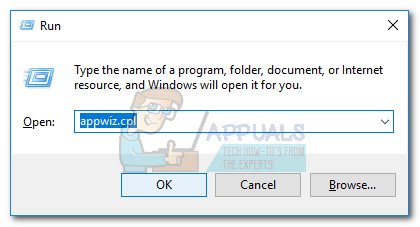
- Press Windows key + R to open up a Run box. Then, type “appwiz.cpl” and hit Enter to open the Programs and Features window.
- Scroll down through the application list and uninstall every Java entry that you can find by right-clicking on each entry and choosing Uninstall.
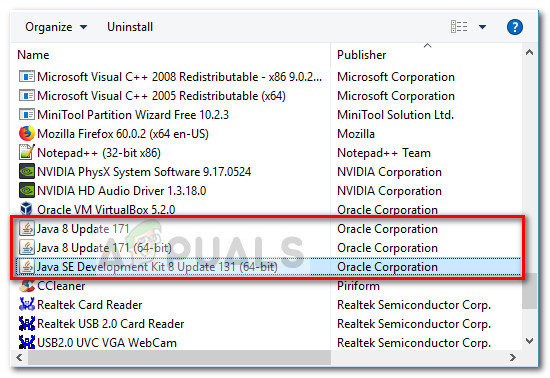
- Once every entry has been uninstalled, reboot your computer.
- At the next startup, visit this link (here) and click on the Free Java Download button to re-install the Java Environment. You’ll be prompted to restart again at the end of this process.
- Once your PC boots back again, see if you are able to open Java-based applications without the “Java(TM) Platform SE binary has stopped working” error. If you’re still seeing the same error message, move down to the final method.
Method 3: Running the application after a Clean Boot
If you find that the “Java(TM) Platform SE binary has stopped working” error doesn’t occur after you do a Clean boot, it’s clear that some of the startup programs and services that were excluded by the Clean boot procedure are to blame for it. Once you confirm this, you should systematically uninstall each suspected software until you eliminate the conflict.
To make things clearer, here’s a quick guide on how to perform a clean boot and identify the startup program that is causing the issue:
- Press Windows key + R to open up a Run box. Next, type “msconfig” and hit Enter to open the System Configuration menu.

- Inside the System Configuration window, navigate to the Services tab and click the Disable all button. Then, hit Apply to save the changes.
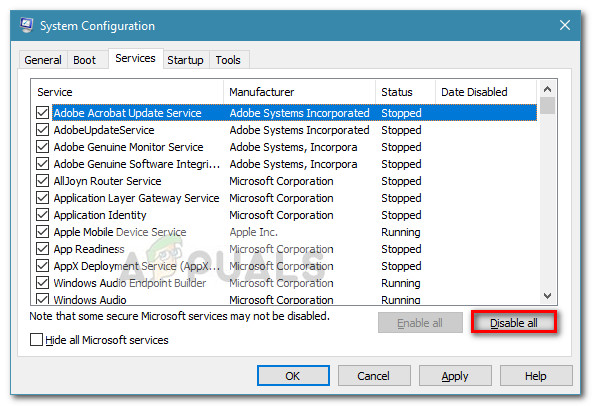
- Next, move to the Startup tab and click on the Open Task Manager.

- In the Startup tab of Task Manager, select each startup item that has the Status set to Enabled and click the Disable button below.
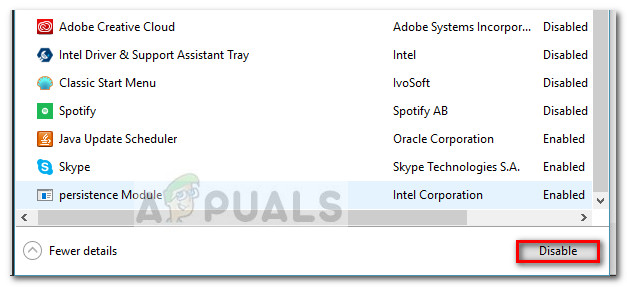
- Once every unnecessary startup process has been disabled, close Task Manager and restart your computer.
- At the next startup, see if the applications open without the “Java(TM) Platform SE binary has stopped working” error. If everything is working normally now, continue with the next steps below.
- Systematically re-enable each startup item and service by reverse-engineering the steps above until the issue resurfaces. Once you identify your culprit, uninstall the application and restart the machine again.
- Use steps 1 to 3 to return to the Services and Startup tabs and re-enable the rest of the services that were previously disabled.
The Java(TM) Platform SE binary has stopped working error can be rectified by tweaking these Windows Error Reporting files and for doing so proceed to the steps indexed below to get rid of this issue:
- Locate the Windows Event Reporting log it is usually located in the following location.
C:\users\username\AppData\Local\Microsoft\Windows\WER\ReportArchive. - Right-click on the “.WER” file and select “Open With”. After that, open it with “Wordpad” or “Notepad”.
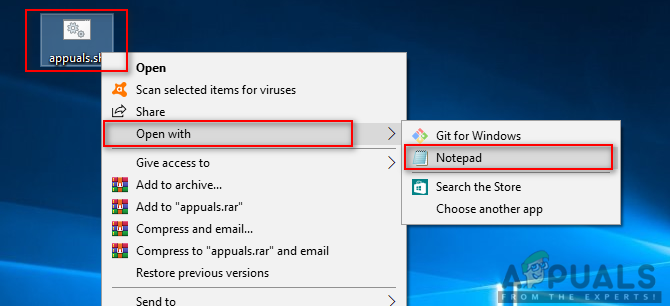
Opening file with Notepad - Navigate to the end of the file to AppPath. It displays the location of the Java.exe file that caused the error. (For example – D:\myapp\subfolder\ocx\jre\bin).
- Navigate to this location and isolate the file that was listed to be the cause of the error.
- Right-click the java.exe file, and select Properties to open the properties for this application.
- Click the “Compatibility tab”, and select the “Change Settings for all Users” option if it is available.
- Clear the “Compatibility mode” checkboxes and select the “Run this program in compatibility mode for:” option and from the dropdown menu choose another version of Windows, preferably older than your current one.
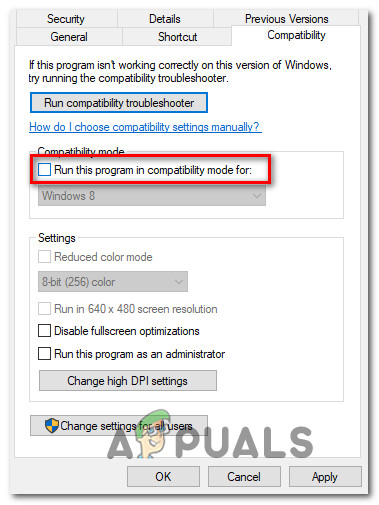
Running the program in compatibility mode - Click OK to close the JAVA Properties window.
- Log out from Web Interface or from the services site and log-on again.
- Try to launch the application that you were trying to launch beforehand and check to see if it works correctly.
Method 5: Launch Sessions with Java Web Start
Windows 7 / 8 Users:
- Press the “Windows” + “R” to open the Run prompt and paste the following command inside it, press “Enter” to execute it, and open the associate file.
control /name Microsoft.DefaultPrograms /page pageFileAssoc
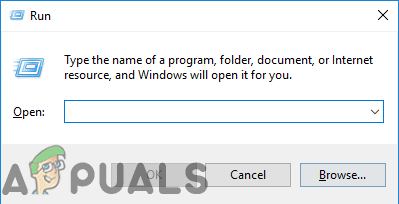
Opening Run Prompt
Note: This will start the Associate a file type or protocol with a program.
- Select the entry for .collab from the list and click the Change program button.
- The “Open with” window will appear and from there you will see a listing for Java(TM) Web Start Launcher in this window, select it and click “OK”.
- Afterward, proceed to step number 7 and if there is no listing for Java(TM) Web Start Launcher in this window, proceed to step number 3.
- Click the “More Apps” link and scroll to the bottom of the list and click on the “Look for another app on this PC”.
- Navigate to the Java directory on your computer and remember that for most systems, this will be one of the following:
C:\Program Files\Java\jre1.8.0_111\bin
C:\Program Files (x86)\Java\jre1.8.0_111\bin
*Note that the number following "jre" above will vary depending on your installed version of Java.
- Now, select the “.exe” file and click on the “Open” button
- Lastly, launch a Collaborate Web Conferencing session and test the application sharing feature and hopefully, the issue would’ve been resolved by now.
Windows 10 Users:
- Close any Collaborate session or recording windows.
- Press “Windows” + “R” to open the Run prompt.
- Type in “Control Panel” and press “Enter” to launch the classic control panel interface.

Accessing the Classic Control Panel interface - Inside the Windows Control Panel, click on the “Program and Features” option.
- Check the list of programs to ensure that “Java” is already installed on the system. If it isn’t installed, please download and install Java from java.com before proceeding.
- Download a new Collaborate meeting or recording file but don’t launch the file yet.
- Locate the meeting or recording “.COLLAB” file in your Downloads
- Right-click on the file and choose “Open with” then click “Choose another app”.
- If you see Java (TM) Web Start Launcher in this list (you may need to click More apps to expand the list), select it and check the box that says “Always use this app to open .collab files” then click the OK
- If Java (TM) Web Start Launcher is not in the list, check the box that says Always use this app to open .collab files then click Look for another app on this PC.
- Navigate to the following location:
C:\program files\java\jreXXX\bin
XXX represents a number that will vary based on the version of Java installed on the computer, for example: jre1.8.0_221.
- Select the file named “.exe” and click Open.
- Going forward, all “.COLLAB” files will open using Java Web Start rather than the Blackboard Collaborate Launcher
- Launch a Collaborate session or recording to test the application sharing functionality.
Method 6: Run System In Safe Mode
- Click the Start button and select the Power icon.
- Hold down the Shift key and click Restart.
- Click the Restart button and your computer will reboot, presenting you with the menu shown below.
- Now, press 4 to select Enable Safe Mode (or 5 to select Enable Safe Mode with Networking if you need to use the Internet).
- Your computer will then boot in safe mode.
To start in safe mode (Windows 7 and earlier):
- Turn on or restart your While it’s booting up, hold down the F8 key before the Windows logo appears.
- A menu will appear. You can then release the F8 key. Use the arrow keys to highlight Safe Mode(or Safe Mode with Networking if you need to use the Internet to solve your problem), then press Enter.
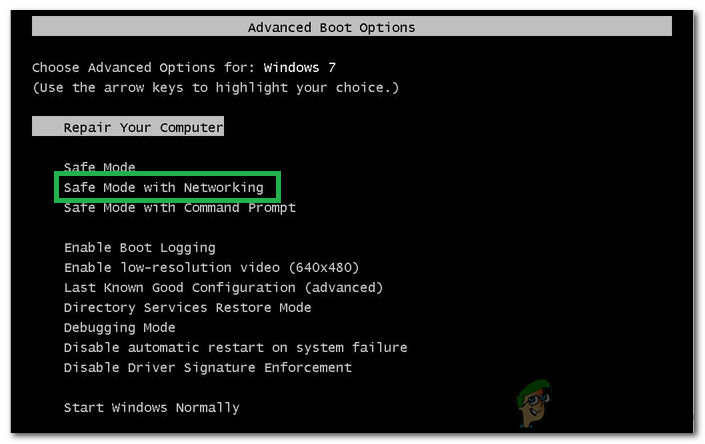
Selecting the “Safe Mode With Networking” option - Your computer will then boot in safe mode.
To start in safe mode on a Mac:
- Turn on or restart your computer. While it’s booting up, hold down the Shift key before the Apple logo appears. Once the logo appears, you can release the Shift key.
- Your computer will then boot in safe mode.
Method 7: Re-Install Minecraft
Most of the people fixed this issue by re-installing Minecraft on their respective systems because an incompatible version or any glitch of Minecraft can cause this error.
- Press “Windows” + “R” to open the Run prompt.
- Type in “appwiz.cpl” and press “Enter” to open the App Manager Window.

Type appwiz.cpl and Press Enter to Open Installed Programs List - Inside the app manager, scroll down and right-click on the “Minecraft” application.
- Select “Uninstall” from the list and then follow the on-screen instructions to remove the application from your computer.
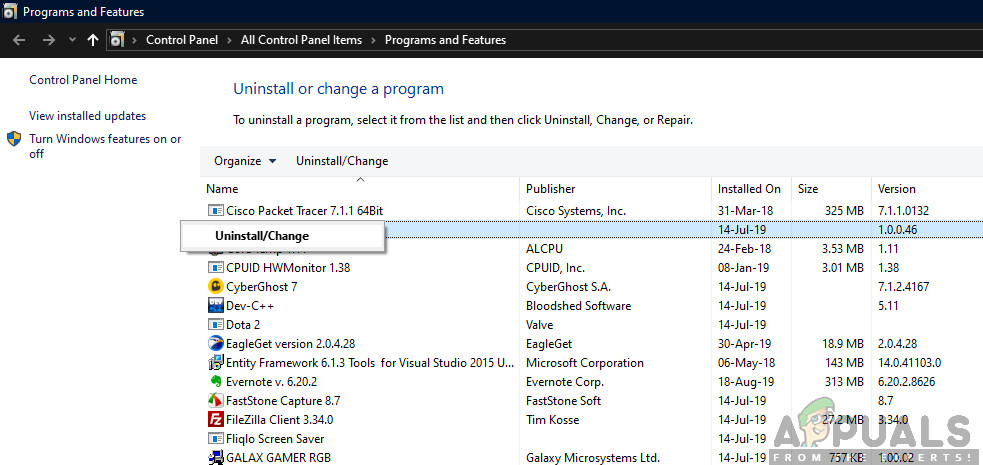
Uninstalling Using Application Manager - Repeat the process above for any instance of the application.
- Afterward, to install the game, navigate here to download the game client. You can download the game client even if you don’t own the game, but you will only be able to play the demo mode. After downloading the client, double-click the icon to run it.
- Follow the on-screen instructions to fully install this application on your computer.
Method 8: Configure Environmental Variables
Many operating systems use environment variables to pass configuration information to applications. As properties in the Java platform, environment variables are key/value pairs, where both the key and the value are strings. After the latest Windows update, a glitch might arise that provokes the Java(TM) Platform SE binary has stopped working issue. Therefore, in this step, we will be resetting the Environmental Variables.
- Press “Windows” + “R” to open the Run prompt.
- Type in “Control Panel” and press “Enter” to open the classical control panel interface.
- In the control panel, click on the “View By:” option and select the “Large Icons” option from the list.

Viewing Control Panel using Large Icons - Click on the “System” option and select the “Advanced System Settings” from the list of available options in the next window.
- Select the “Advanced” tab from the top and then click on “Environment Variables” on the bottom of the screen.
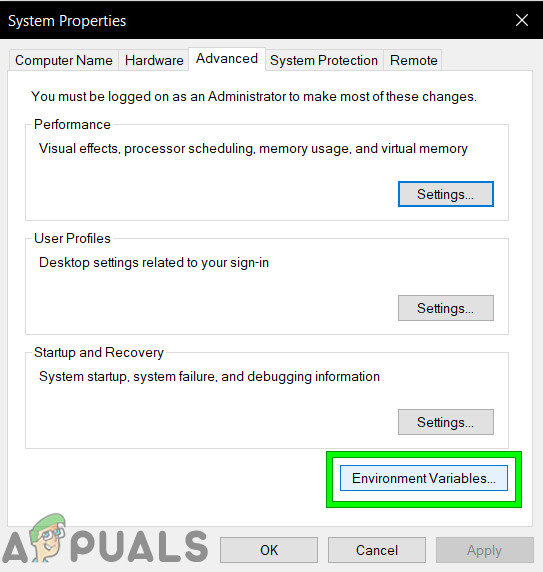
Click on Environmental Variables - Next, click the “New” button under “System variables” option to open the next window.
- Enter “_JAVA_OPTIONS” in the Variable name text box.
- Type “-Xmx256M” in the Variable value box.
- Save your changes and click on “OK” to exit the system variables window.
- After doing so, click on the “OK” button again to exit out of this window entirely.
- Now that the process is completed, check to see if the error message still persists.
Method 9: Remove Older Java Versions (Using Script)
Note: This package checks for both 32-bit and 64-bit installed versions of Java, and silently uninstalls any old versions leaving behind only the newest and as this is just a simple Powershell script, it can also be run on its own. Keep one thing in mind that the script is a little slow as enumerating the WMI class Win32_Product takes a long time.
#This script is used to remove any old Java versions, and leave only the newest.

#Original author: mmcpherson

#Version 1.0 - created 2015-04-24

#Version 1.1 - updated 2015-05-20

#            - Now also detects and removes old Java non-update base versions (i.e. Java versions without Update #)

#            - Now also removes Java 6 and below, plus added ability to manually change this behaviour.

#            - Added uninstall default behaviour to never reboot (now uses msiexec.exe for uninstall)

#Version 1.2 - updated 2015-07-28

#            - Bug fixes: null array and op_addition errors.

# IMPORTANT NOTE: If you would like Java versions 6 and below to remain, please edit the next line and replace $true with $false

$UninstallJava6andBelow = $true

#Declare version arrays

$32bitJava = @()

$64bitJava = @()

$32bitVersions = @()

$64bitVersions = @()
#Perform WMI query to find installed Java Updates

if ($UninstallJava6andBelow) {

    $32bitJava += Get-WmiObject -Class Win32_Product | Where-Object {

        $_.Name -match "(?i)Java(\(TM\))*\s\d+(\sUpdate\s\d+)*$"

    }

    #Also find Java version 5, but handled slightly different as CPU bit is only distinguishable by the GUID

    $32bitJava += Get-WmiObject -Class Win32_Product | Where-Object {

        ($_.Name -match "(?i)J2SE\sRuntime\sEnvironment\s\d[.]\d(\sUpdate\s\d+)*$") -and ($_.IdentifyingNumber -match "^\{32")

    }

} else {

    $32bitJava += Get-WmiObject -Class Win32_Product | Where-Object {

        $_.Name -match "(?i)Java((\(TM\) 7)|(\s\d+))(\sUpdate\s\d+)*$"

    }

}
#Perform WMI query to find installed Java Updates (64-bit)

if ($UninstallJava6andBelow) {

    $64bitJava += Get-WmiObject -Class Win32_Product | Where-Object {

        $_.Name -match "(?i)Java(\(TM\))*\s\d+(\sUpdate\s\d+)*\s[(]64-bit[)]$"

    }

    #Also find Java version 5, but handled slightly different as CPU bit is only distinguishable by the GUID

    $64bitJava += Get-WmiObject -Class Win32_Product | Where-Object {

        ($_.Name -match "(?i)J2SE\sRuntime\sEnvironment\s\d[.]\d(\sUpdate\s\d+)*$") -and ($_.IdentifyingNumber -match "^\{64")

    }

} else {

    $64bitJava += Get-WmiObject -Class Win32_Product | Where-Object {

        $_.Name -match "(?i)Java((\(TM\) 7)|(\s\d+))(\sUpdate\s\d+)*\s[(]64-bit[)]$"

    }

}
#Enumerate and populate array of versions

Foreach ($app in $32bitJava) {

    if ($app -ne $null) { $32bitVersions += $app.Version }

}

#Enumerate and populate array of versions

Foreach ($app in $64bitJava) {

    if ($app -ne $null) { $64bitVersions += $app.Version }

}

#Create an array that is sorted correctly by the actual Version (as a System.Version object) rather than by value.

$sorted32bitVersions = $32bitVersions | %{ New-Object System.Version ($_) } | sort

$sorted64bitVersions = $64bitVersions | %{ New-Object System.Version ($_) } | sort

#If a single result is returned, convert the result into a single value array so we don't run in to trouble calling .GetUpperBound later

if($sorted32bitVersions -isnot [system.array]) { $sorted32bitVersions = @($sorted32bitVersions)}

if($sorted64bitVersions -isnot [system.array]) { $sorted64bitVersions = @($sorted64bitVersions)}

#Grab the value of the newest version from the array, first converting

$newest32bitVersion = $sorted32bitVersions[$sorted32bitVersions.GetUpperBound(0)]

$newest64bitVersion = $sorted64bitVersions[$sorted64bitVersions.GetUpperBound(0)]


Foreach ($app in $32bitJava) {

    if ($app -ne $null)

    {

        # Remove all versions of Java, where the version does not match the newest version.

        if (($app.Version -ne $newest32bitVersion) -and ($newest32bitVersion -ne $null)) {

           $appGUID = $app.Properties["IdentifyingNumber"].Value.ToString()

           Start-Process -FilePath "msiexec.exe" -ArgumentList "/qn /norestart /x $($appGUID)" -Wait -Passthru

           #write-host "Uninstalling 32-bit version: " $app

        }

    }

}

Foreach ($app in $64bitJava) {

    if ($app -ne $null)

    {

        # Remove all versions of Java, where the version does not match the newest version.

        if (($app.Version -ne $newest64bitVersion) -and ($newest64bitVersion -ne $null)) {

        $appGUID = $app.Properties["IdentifyingNumber"].Value.ToString()

           Start-Process -FilePath "msiexec.exe" -ArgumentList "/qn /norestart /x $($appGUID)" -Wait -Passthru

           #write-host "Uninstalling 64-bit version: " $app

        }

    }

}
Method 10: Clear Java Cache
Find the Java Control Panel – Java 7 Update 40 (7u40) and later versions:
Starting with Java 7 Update 40, you can find the Java Control Panel through the Windows Start menu.
- Launch the Windows Start menu
- Click on Programs(All Apps on Windows 10)
- Find the Java program listing
- Click Configure Java to launch the Java Control Panel
Find the Java Control Panel – Versions below 7u40:
Windows 10:
- Press “Windows” + “R” to open the Run prompt and type in “Control Panel”.
- In the Windows Control Panel, click on Programs.
- Click on the Java icon to open the Java Control Panel.
Windows 8:
- Press “Windows” + “R” to open the Run prompt and type in “Control Panel”.
- Press Windows logo key + W to open the Search charm to search settings
OR
Drag the Mouse pointer to the bottom-right corner of the screen, then click on the Search - In the search box enter Java Control Panel
- Click on the Java icon to open the Java Control Panel.
Windows 7, Vista:
- Press Windows + R to open the Run prompt.
- Type in “Control Panel” in the run prompt and press “Enter” to launch it.

Accessing the Classic Control Panel interface - In the Control Panel, search for “Java Control Panel”
- Launch the control panel from the list of searches.
An alternate method of launching the Java Control Panel:
- Press “Windows” + “R” to open the Run prompt.

Opening Run Prompt - Type in the following lines in the Run prompt depending upon your system.
Windows 32-bit OS: c:\Program Files\Java\jre7\bin\javacpl.exe
Windows 64-bit OS: c:\Program Files (x86)\Java\jre7\bin\javacpl.exe
- This should launch the Java Control Panel.
Clear Cache:
Now that you have launched the Java Control Panel, we will be moving on towards actually clearing the Cache. For that:
- Click on the “General” tab and then select the “Settings” option under the “Temporary Internet Files” heading.
- Click on the “Delete Files” button in the next window that appears.
- Check all the options in the next window to make sure that all the cache gets cleared.
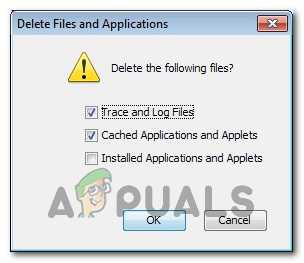
Checking all Options - Click on “OK” to start the clearing process.
![]()
Bill is a certified Microsoft Professional providing assistance to over 500 remotely connected employees and managing Windows 2008 to 2016 servers.
